Table of Contents
How to change the look of a Nucleus site
Author: Roel Groeneveld (roel on Nucleus forums). This tutorial is considered complete, but never finished. Updates and suggestions are always welcome, please send those to me. Or reply to this forum thread. Thanks! (August 7, 2003)
Introduction
You have just installed Nucleus, and now the first thing you want to do is change the look of your brand new weblog/news page. For new users, the way Nucleus handles web pages can be confusing at first. This document will try to guide you through the processes needed to make this excellent tool look the way you want it to.
In this howto, we will explain:
- How Nucleus controls the layout of the different pages.
- How you can change that default look.
- Modify the default design.
- Create your own skin.
Nucleus Skins & Templates
The design of Nucleus-generated sites is managed by the combination of skins & templates. Skins determine the overall look of pages generated by Nucleus. Templates control the always changing parts of the weblog that appear on these different pages. These work together to offer you maximum flexibility, and (once you understand the concept) are very ease to manage.
The Skins
The skins controls the different pages that are part of a weblog. These mainly include the static parts of your site (e.g. the header, site navigation & copyright disclaimer that surround the articles you post). A skin consists of 8 different skinparts. Each of those controls a different kind of webpage served up by Nucleus:
- Main Index skinpart → manages the front page of your weblog
- Item Pages skinpart → the look of individual item pages
- Archive List skinpart → displays an overview of archived blog pages (default is per month).
- Archive skinpart → controls the display of the monthly archive pages are displayed
- Member Details skinpart → is used to show information about blog members, and a mailform so visitors can contact them
- Search skinpart → controls the look of the search results pages
- Errors skinpart → enables you to customize the Nucleus error page
- Image popups skinpart → when adding images to a post, you can choose if they should be displayed inline or as pop-up. Image pop-ups are controlled by this skinpart
The Templates
The templates control the formatting of dynamic parts of weblog pages. These dynamic parts are things like individual articles (or posts), archive listings, and comments. These are included in the skins as separate blocks of content. For a complete site, there are always two different templates:
- Default template → most often used to format articles and other blocks of content of the front page and in the archives.
- Detailed template → always needed to display a selected article or post on an item page.
The CSS
Modern web designers separate appearance from information, context from content. This can be achieved by putting all design declarations into a stylesheet, a .css file, and linking the different pages of a site to that file. An example of that method is the default Nucleus design. This setup has many advantages, for instance: you can change the design of the entire site by editing just the stylesheet.
If you are interested in learning more about this subject, read Westciv.com's Guide to how stylesheets work.
XML-RSS
The xml-rss skins & templates are somewhat different. But you should never need to change those, They are used to generate a newsfeed from your site's content.
Example
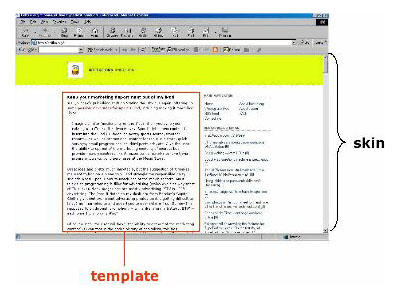
Let's presume that kottke.org is powered by Nucleus. Then the front page of that site would be controlled by a skin and a template like this:

Screenshot 1: Template inside front page skin.
If you want to start changing the look of your site, the concept to remember in the back of your mind is that: dynamic blocks of content (templates) can be inserted into, moved around and removed from the Nucleus webpages (skins). Now let's start changing that bland default design!
Change the default design
Some basic changes
If you only want to make some basic changes, leave the skins & templates alone. Start by replacing the Nucleus logo in the upper left corner with your own. Then download the stylesheet connected to the default skin. Both files can be found here:
yoursite.com/skins/base/
- The Nucleus logo is called atom.gif. Just give your logo the same name (and take care it has the same width and height), then upload it to the same directory.
- You can edit the stylesheet default.css in a normal text editor like NotePad. However, I recommend a good CSS editor like Topstyle Lite, or Pro, for beginners and more experienced users.
Your may be asking: “what can I do with this stylesheet?” Well, as mentioned before, default.css controls the appearance of all default Nucleus weblog pages. By editing it, you can easily change or apply new colors, font characteristics, background images to all pages at once. Furthermore, through a stylesheet you control where blocks of content are positioned. And much, much more.
The stylesheet will enable you to change the look of your site. But I bet you want to have more control over the look of your site, so there is nothing else to do but dive into Nucleus skins!
Dive into skins
First off, log into your admin area and select Nucleus Management. On the page that now appears, under the heading Skins and Templates, is where you will start creating your personal site design.
It is always a good idea to start by cloning the original default skin and default & detailed templates. That way you will not be working on the skin that is controlling your current site design. Here's how:
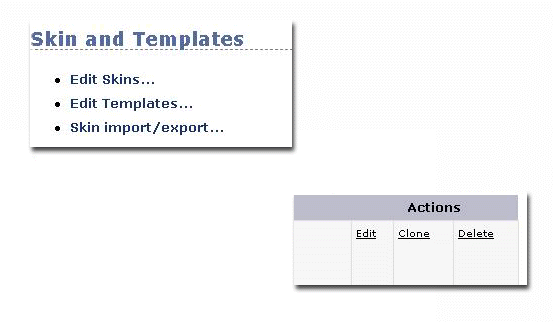
- On the
Nucleus Managementpage, selectEdit Skins, now clone thedefaultskin. In the list of skins, you will now see a skin calledcloneddefault. - Now edit the cloneddefault skin, and change the following settings:
- change 'cloneddefault' to a new name, for example 'blueSkin'. (NOTE: you can only use alphanumeric characters in the skin name)
- change the description to something suitable.
- take care that the radio button next to
Include Modeis set to 'Use skin dir' - change the
Include prefixfield to 'blueskin'. - Click on 'Change these settings'
- Go back to Skin Overview, and back to Nucleus Management
- Now clone the default and detailed templates, and also rename those to something like 'blueDefault' and 'blueDetailed'.
- Fire up your ftp program for one second, and create a 'blueskin' directory inside the already existing 'skins' directory. This is where the images and .css-file that belong wih the blueSkin will go.

Screenshot 2: Choose Edit Skins on the Nucleus Management page → Clone the default skin.
Now you can start to edit the code of the newly created blue skin and templates.
A large part of the skins and templates are made up out of simple HTML code. In addition to the HTML, you will find Nucleus code that inserts every piece of dynamic information into your webpages. How do you recognize the difference?
- HTML code is always enclosed by
<and>. - Nucleus code looks very similar, but it is enclosed by
<%and%>. In the documentation and the Nucleus support forum, Nucleus code inside skins is referred to as skinvar(s), and inside templates as templatevar(s).
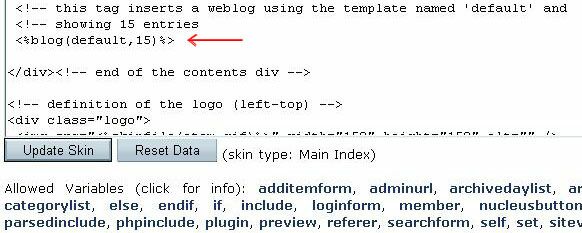
Within the Nucleus Admin Area, a lot of assistance is provided. All the small white on darkblue question marks are links to the documentation. And on every 'Edit Skin' page, you will find a list of available skinvars displayed under the editable code box (see screenshot below). Each skinvar is actually a helpful link to an explanation of that variable, so use it!

Screenshot 3: Part of the Edit Main Index page.
The first step after cloning the default skin and templates is to edit all the skinvars that refer to the default templates. An example is the <%blog(default,15)%> skinvar in the screenshot above. It tells the front page skin to display 15 entries using the default template. But we want it to link to blueDefault (and all references to detailed to change to blueDetailed). Change those references accordingly. Don't forget to click on 'Update Skin'. Now you can start changing the design!
When you look at a basic website, you will see it always has a standard structure:
 <!DOCTYPE HTML PUBLIC "-//W3C//DTD HTML 4.01 Transitional//EN" "http://www.w3.org/TR/html4/loose.dtd">
 <html>
 <head>
 <title>Title of page</title>
 </head>
 <body>
 This is my first homepage. <strong>This text is bold</strong>
 </body>
 </html>
All Nucleus skins are built around this basic website structure. The only part you need to edit is the one between <body> and </body>, because this is the part that will be displayed in browsers. Change things to your liking, and don't forget to save.
If you are satisfied with the new 'blue' theme you created for your site, go to the settings for your blog and set the default skin to blueSkin (or whatever you named your skin). All right, you're ready!
Testing the skin
I always test a new skin before making it the default one for my blog. That way, your visitors will not be confronted with a half-finished design. You can do this by:
- adding
?skinid=skinnumberto your blog url if it ends with either a forward slash (/) orindex.php. - or
&skinid=skinnumerif your weblog's url looks likeyourdomain.com/index.php?itemid=XXXX
You can find out what skinid is connected to your new skin by hovering over the Clone, Edit or Delete links on the 'Skin Overview' page (see the Edit Skins' image). These url's will look like this in your status bar:
http://www.yourblog.com/nucleus/index.php?action=skinedit&skinid=12
In my case, 12 was the skinid of my new skin.
Web design resources
Because you can find hundreds of web design tutorials on the web, this subject will not be discussed here. Links to some good resources are provided below.
Cascading Stylesheets, more information about CSS can be found at:
Every person who designs webpages (for fun, or professionally) learns new tricks by viewing the source of other sites. Some people make this even easier for me and you, by publishing ready-to-use designs to the web. Everyone may copy these, just leave a little 'Thank you'-note on your pages.