Table of Contents
WebCalendar: Tutorial (v0.9.44)
Author: John Alcheman of Organic Digital Web Design http://www.organicdigital.com
Welcome to Web Calendar!
Your Web Calendar can be accessed through any computer connected to the Internet.
With Web Calendar you will be able to:
- Create events for your own calendar (both for work and personal)
- Create events for/with others that will show up on their calendar.
- Create events for multiple people (including yourself)
- View the schedule of other faculty members
- Search for events
- Get email reminders for events
- Export events to a Palm Pilot or Ical
- Look at multiple calendars simultaneously (great for scheduling)
This tutorial will be a walk-through guide for the Web Calendar. It is highly recommended that you use web calendar while going through this walk-through
To start visit your web calendar login page
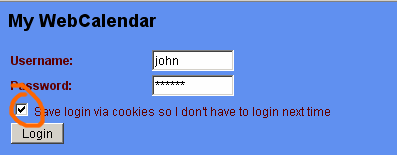
You will see this screen:
Login using your name and password. Note that if you are on your own computer you may check the circled box. You will not have to go through this login process again on that computer. If you are using a shared computer (like in a lab), make sure this box is not checked or others may be able to access your calendar.
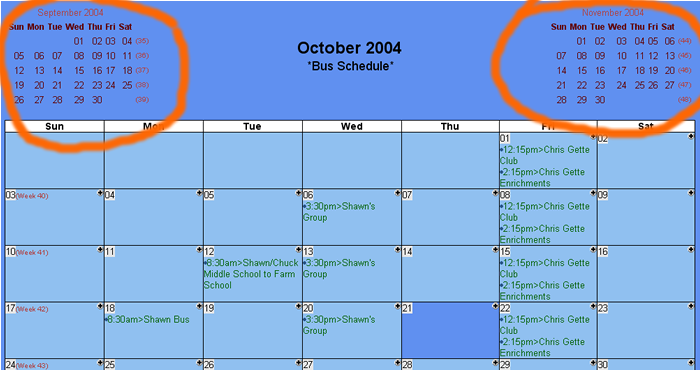
When you are logged in you will see a screen like this:
Note the months on either side at the top. You may click on these to navigate to the month of your choice. Also note that today's date (the 21st on this calendar) is highlighted in a darker blue. The small red numbers by the side will take you to that particular week.
You may also easily navigate at the bottom of the page to show a month view, a week view or a year view by choosing the month/weeek/year and clicking the Go button. Try it out:
The Menu
At the bottom of every page you will see a menu that looks like this:
Note the “Printer Friendly” link at the top. This will create a temporary calendar that is suitable for printing.
Now let's go through the main menu options one by one:
My Calendar/Today
These are like a 'home' link on a web site. No matter where you are on this site, you can always click this to return to your main calendar page.
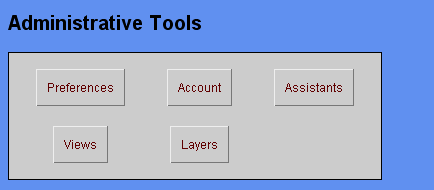
Admin
Preferences
The link labeled “Preferences” will allow you to change a number of different things with your web calendar. Generally, it is not advisable to change your preferences, but there are a few things that you may want to change before you start using your calendar so let's go through them:
- Language/Timezone Offset/Fonts: You will want to leave these alone.
- Preferred View: This sets your default calendar view. If you have a full calendar, you may prefer a week view (or even a day view). For others the month view is optimal.
- Display Weekends in Week View: If you use the week view, this determines if Saturday and Sunday are shown on your calendar.
- Display Description in Printer Day View: This will show descriptions if you use the “print” function.
- Date Format: Choose whichever you prefer.
- Time Format: Most people would prefer a 12 hour clock, though you may prefer military time.
- Time Interval: You will want to keep this set to 1 hour.
- Auto Refresh Calendar: This will check for new events that might have been added to your calendar at certain time intervals.
- Auto refresh time: Keep it set at 0 minutes.
- Display Unapproved: Keep at No if you would prefer to approve events before they appear on your calendar (recommended).
- Display Week Number: Will make a note at the top of the page as to what week it is in the year.
- Week Starts on: Sunday or Monday. Whatever your preference is.
- Work Hours: If you attempt to put in an event outside of your work hours you will get a warning message.
- Specify Timed Event Length by: Keep this set at Duration.
- Email Section: It is recommended to keep all of these on Yes.
- When I am the Boss: You can modify this section only if you will have an “assistant”(this will be covered later) who has access to modify your calendar.
- Colors: You may change the color scheme of your calendar if you wish.
If you change anything on this page make sure to push “Save Preferences” at the bottom of the page.
Account
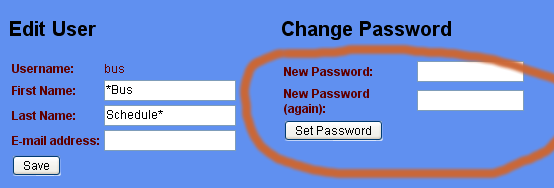
The account link enables you to change your name, password and/or email. Generally you will not need to use this feature. If you have a generic password (yourname+777) you may wish to change to a more secure password. To do this simply input your desired password twice and click “set password”:
Assistants
Most of you will not use this function. It is useful if you have other people making your appointments for you. Making someone an assistant will give them the ability to add events directly to your calendar without your approval (unless this is modified in preferences as stated a few lines above this). To use, simply choose your assistant(s) and click save.
Views
Views are a way of comparing calendars side by side and can be useful for scheduling. If you do not plan on doing scheduling with Web Calendar, you may skip this section and the section entitle Layers following this one. If you do scheduling, you will find these two features very useful.
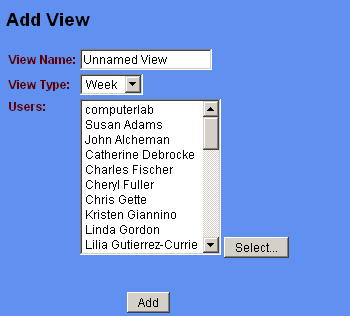
To start click on “Add new View” and you will be taken to a screen that looks like this:
For View Name it is recommended to put in the names of the people that will be included in this 'view'. For example Kristen/Linda. Next choose a week or month view. Finally select the users (use the <control> or <apple> key again to select multiple users). Once again you can use the “Select” button to select groups. When you are finished click “Add”. You will then be taken to your 'views' screen where this new view will be listed. Note that this link is also now available in your main menu at the bottom of each page:
When you click on this link (at the bottome) you will be taken to a screen that looks like this:
Notice how you can now see both Kristens and Lindas schedule side by side. If you do a lot of scheduling with someone or a small group views can be very useful. You may have as many different views as you wish with different groups of people.
Layers
Layers are similar to views, except that instead of being able to view other user calendars side by side, they are laid on top of each other. Unlike Views, you may only have one set of layers at a time. You will find the Layers options are in the Admin menu (2 lines down):
If your menu says 'Disable Layers' like in this example. Click on it and you will see 'enable layers' instead. If it already says 'Enable Layers' leave it alone and go on to the next step.
Now, let's create a layer set.
Click on “Edit Layers” (on the 3rd line down). On the next page click on “Add Layer” at the top left.We will now add someone else as a layer.
From the pull down menu labeled 'source' choose a person for your layer. For this example choose someone who is actively using the calendar. Be aware that you do not need to choose yourself as a layer. Layers will be overlaid over your own calendar.
Next select a color. Try to choose a color that will contrast well with the background. Check off the 'Duplicates' box and click 'Save'. Go down to the bottom and click 'My Calendar'. (remember that if you ever get lost and want to get back to your calendar this is the way to do it).
Now click on 'Enable Layers'. Try clicking on this a couple times disabling and enabling layers and you will get a better idea of how layers work.
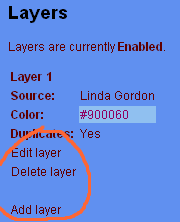
After this click 'Edit Layers' again. You will see 'Layer 1' that you just created. Underneath 'Duplicates' you will see three options:
Click on 'edit layer' and you will be able to edit this layer. For example, if the color you chose for the text is not readable over the background color, this where you could change it. You may also choose to 'Delete layer' or 'Add layer'. You may add as many 'layers' as you wish so you can see multiple peoples calendars at one time. It is unadvisable to add more than 3 or so people at a time as the calendar may become illegible.
Login/Logout
If you are using a shared computer you will want to logout when you are finished or others may be able to access your calendar.
Unapproved Events
When you login, you may or may not have a link that says “You have X unapproved events”:
When you do have this link, it is generally the first place that you want to visit. What it means is that other people are attempting to add a meeting or event to your calendar. If another person creates an event such as a meeting that includes you, it will not show up on your calendar until you specifically approve it. You may click this link to see your unapproved events. You will also be notified by email whenever you have unapproved events:
By clicking on the “You have X unapproved events” you will be taken to the unapproved events screen which looks like this:
You may choose to Approve/Confirm in which case this event will be added to your calendar. Or you may reject the event and the person who created the event will be notified. Unfortunately you may not give a reason why you rejected it here.
Another Users Calendar
Use this function to view another persons calendar. After clicking on the link you will be taken to a page that has this in the upper right hand:
Simply choose someone from the pull down menu and click “Go”. Note that when you are viewing another persons calendar their name will show up at the top. To get back to your own calendar click on the 'My Calendar' link in the lower left.
Search
This will bring up a search box where you can input a keyword and get relevant entries.
Export
Calendars can be exported to a Palm Pilot or iCal format. If you would like to use this function and can't figure it out please consult John or Jim.
Import
Data can be imported from Palm Desktop, VCalendar and ICalendar. If you would like to use this function and can't figure it out please consult John or Jim.
Add New Entry
This will be the most used function on Web Calendar. Use this function to add events to yours or anothers calendar.
Note that an easier way to access this page is to click on one of the small crosses in your calendar:
Accessing this section in this way will automatically fill out your date and/or time.
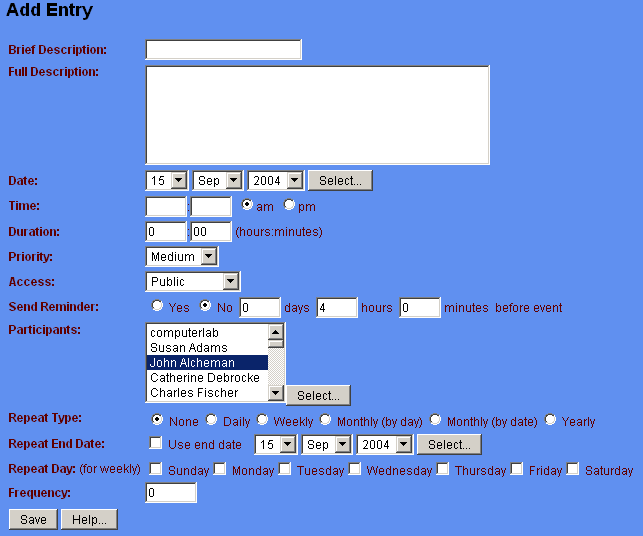
When you click Add New Entry you will come to a screen that looks like this:
Let's go through these one by one. You are encouraged to put in a real event while reading through this section.
- Brief Description: This is what will show up on the calendar so make it as descriptive as you need to.
- Full Description: This is the information you will see after clicking on an event title.
- Date: Today's date is the default. If you are not sure of what the exact date you want is, choose the “select” button and a mini-calendar will pop up that you can select a date from.
- Time: Put an hour in the first box and minutes in the second box. Make sure to choose AM or PM.
- Duration: How long will the event be? Make sure to put both hours and minutes.
- Priority: This determines how big/bold the font for the event is. (high priority show up as bold, low priorities show up as small). This feature is optional.
- Access: If you have a personal event happening that you would like on your calendar you may choose 'confidential'. If someone else looks at your calendar, this time will still be blocked out but the event will simply be labeled 'confidential' and will have no details.
- Send Reminder: One of the most useful functions of Web Calendar is its ability to send email reminders to yourself. If you wish to have a reminder, choose 'Yes' and put in the day/hours/minutes before the event that you would like the reminder sent.
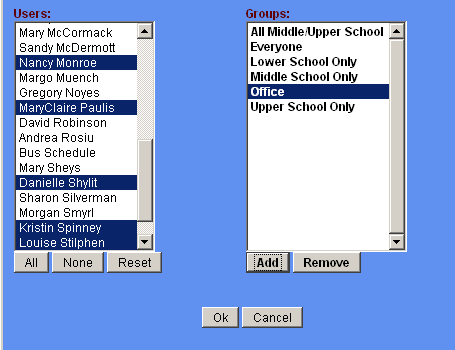
- Participants: If you are scheduling an event for yourself, you don't need to touch this as you are automatically selected. Be aware though that if you are including others as part of the event, you must be sure to choose yourself as well. To choose multiple people, hold down the <ctrl> key if you are a PC user and hold down the <apple> key if you are a Mac user while you select people. If you need to choose a number of people or would like to choose an entire group (e.g. all high school faculty) click on the select button and a screen will come up that looks like this:
To add a whole group select the group you want and click the 'add' button. In this example, the group 'office' was selected and all the people in that group are highlighted on the left. You may add as many users as you want on the left using the <ctrl> or <apple> key and click OK when you are finished.
Repeat Type: There are four options:
- None - For one time only events
- Daily - For events that will repeat daily until a certain date
- Weekly - For events that will occur once (or more) every week until a specified date.
- Monthly (by day) - For events that occur every month on a certain day (e.g. a meeting on the third Thursday of every month)
- Monthly (by date) - For events that occur every month on a certain date (e.g. the 5th of every month).
- Yearly - For events that occur on the same date every year.
- *Repeat End Date: Important! If your event is a repeating event you must put in an end date. Not doing so may result in program errors. Select “use end date” and put in the appropriate end date. You may use the 'select' button to get a pop-up calendar. Repeat Day (for weekly): If you have a weekly event that occurs on one or multiple days you may specify this day(s) here. For example if you have a class that meets on Tuesdays and Thursdays, simply select Tuesday and Thursday. Frequency:** Use this to schedule events such as bi-weekly/bi-monthly. A 1 indicates that it will happen once a week/month. A 2 to indicate a bi-weekly or bi-monthly meeting.
When you are finished push the 'save' button to save your event.
Assistants
Same as covered earlier
Help
There is limited online help available.

